Boho Bathroom Remodel
Hi!! Seeking Alexi here and I’m so stoked to share my recent full bathroom remodel! If you’ve been following along on my Instagram, you may have seen sneak peeks of me ripping up this bathroom and slowly renovating it. It was a disaster of a 70s bathroom before, with really weird shower surround material and old dingy everything else, take a look:

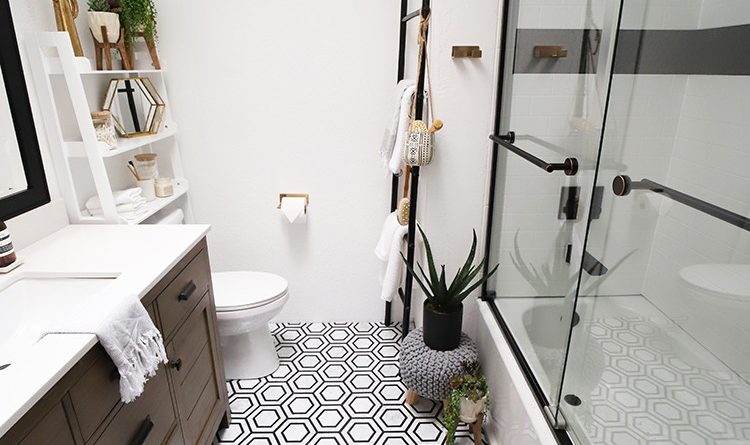
With several Delta products, some decor from The Home Depot and a lot of elbow grease, I have magically turned this drab bathroom into this gorgeous oasis!

I still can’t believe that this gorgeous space is truly ours! And that I was able to successfully do all of it without hiring any of it out (although I had my husband Tanner help a few short times).
It’s technically the bathroom that our guests will use when they visit, but now it’s much nicer than our actual master bathroom! So watch out because until I remodel the master bath, I’m moving in! I mean, how could I not???
Not only does this new bathroom look amazing, but installing this Delta UPstile system for the tub surround was light-years easier than tiling it. Plus, I’m so pleased with how it looks!
This whole bathroom remodel took a fair amount of time, but it was well worth the elbow grease! Here’s how I renovated my entire bathroom.
Demo the Bathroom

First step I took was to remove the shower surround and drywall and take out the existing tub. Doesn’t matter quite how you do it, but just do it. It was a messy job, but it’s a step that just has to get done! I also made sure that all the surrounding studs were plumb.
Install the tub

I installed this Delta tub that goes with the Delta UPstile system, and the instructions are very easy to follow. I’ll spare you every step here, but one thing I did do was install the drain system to the existing p-trap, and when I went to connect them, I had to cut a hole in the basement ceiling.
Install the Delta UPstile System
Once your tub is installed, you’re ready to install your Delta UPstile system shower surround! We kept the protective plastic on as long as possible to keep it protected. But it comes in 3 sheets and you have to install the back piece first. There are very thorough instructions on The Home Depot website, plus detailed paper instructions included. Because of that, I’ll highlight the steps below but follow the full instructions when you install yours.
1. Dry fit the panels, first to make sure it all fits.

2. Mark where your valve and spout holes go

… And drill holes for your spout and valve.

3. Install 1×3 boards as per the instructions.

Pre-drill holes through the panels along the studs.
4. Install the back panel first, by placing the provided adhesive strips and DAP Kitchen & Bath 3.0 Advanced Sealant on the 1x3s, then screw it in place.

Repeat steps 1 through 4 for the side panels.
Install & Texture drywall
Next, we installed drywall over the flanges of the panels. We used ⅝ drywall to match the rest of our house and it worked perfectly!
Add real tile in the grooves

To install tile, use same advanced sealant instead of mortar, then stick on your tile and after it dries, grout the tile as you normally would. Be sure to use Frog tape to protect your panels, and you’ll have a perfectly clean line when you peel it off.
Fill all seams with sealant
After you’ve painted your drywall then, fill all seams around and in between the panels with the same advanced sealant.
Lastly, everything else came together to completely transform this bathroom to what it is today!

A few of the last details were that I installed the gorgeous Delta sliding shower door that is quiet and very secure and elevates the luxury of the whole look and feel of the bathroom.

I installed this stunning rain Delta shower head that makes you feel like you’re showering in luxury, plus it’s tall enough to work for my 6’3” hubby, instead of hitting him mid-chest like before.

Along with the new shower head, I installed a gorgeous matte black tub spout, & shower dial.
The new toilet I installed is elongated for more comfort, and definitely works better than my old toilet from the 70s!

And check out the new toilet handle I installed so it would match the other gold details in the bathroom.
And last but not least, I installed this new vanity that I’m obsessed with. It has quiet drawers, plenty of storage, and I love the warm yet cool wood color! I paired it with this this Delta faucet hardware to bring the whole look together.


Thank you so much for reading how I remodeled my entire bathroom and how I installed the Delta UPstile System in my bathroom! I still want to pinch myself whenever I walk by my bathroom, I can’t believe how amazing it looks! And even more, that we did it all by ourselves! If it seems daunting, I break some of the project down and show the behind the scenes over on my YouTube channel. Thank you to Delta and The Home Depot for making all of my guest bathroom dreams come true!
The post Boho Bathroom Remodel appeared first on The Home Depot Blog.


No Responses Yet