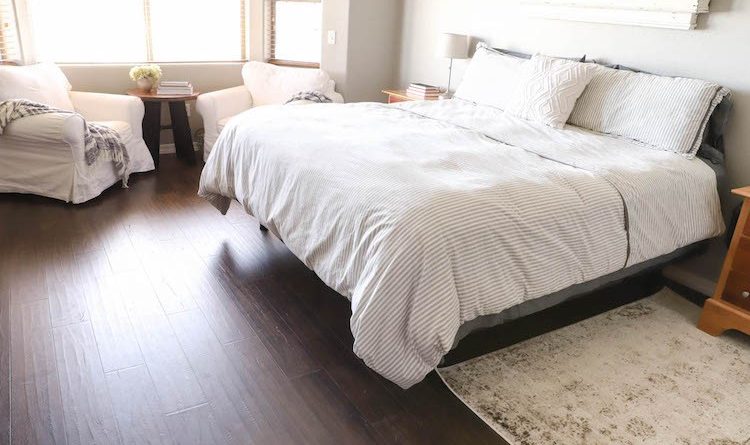
When we bought our house nearly nine years ago, we installed new floors throughout, including carpeting in the bedrooms. Between two growing boys and a dog, the carpet has really taken a beating. So, we’ve been changing out the bedrooms to laminate over the past several months. Our bedroom was the final room on the list. For a while now, we’ve been wanting to remodel our bedroom. Finally, we came up with a plan and step 1 is the flooring.

We chose Pergo Outlast+ laminate flooring in Java Scraped Oak for our bedroom. We recently installed this same flooring in a different color in each of our boys’ rooms as well. The list of things I love about this flooring could go on and on. For starters, it’s waterproof. With having a pool, it was very important to me that the floors be able to withstand wet towels, or a wet dog (should she sneak her way back into the house before she’s dry). Given that the majority of the house is tile, I wanted to be able to seamlessly go from the main house to the bedrooms while mopping without having to change to a different type of mop or cleaner.
The flooring is extremely durable, it comes with the underlayment already attached, and it has a limited lifetime warranty against fading, wear, and water damage. All of this at an incredible price! My youngest has had Pergo Outlast+ in his room since last August, so I can definitely attest to the durability factor.
Flooring Color Selection
When picking out flooring, make sure that you grab your favorite flooring samples and colors and take them home with you. The lighting in your house will be different than it is at The Home Depot and it’s amazing how colors can change in a different environment. Most of the flooring options are on display at The Home Depot so you can also see what a bigger area would look like. You can also check online where they’ll have whole room photos that will help you in your decision making process. I struggled a bit with my decision, but I really liked the color and the tool marks on the Java Scraped Oak and knew the color would work great in our room.
How Much To Purchase

This flooring is very easy to install yourself, which is the route we chose to go. Take measurements of the room(s) you’ll be installing the flooring in and write them down. Don’t forget about areas such as bay windows, angled walls, or other nooks. Once you calculate the total square footage, it’s always best to then add 10% onto the top. This ensures that you will have enough flooring for any special cuts you need to make or any mistakes that may happen. We ordered 10% extra on each of our boys’ rooms and had only a few boards left over after each project. Don’t forget to purchase coordinating threshold pieces if you’ll be joining the flooring up to other flooring in your home, such as carpet or tile.
Tools You’ll Need


With several laminate installs under my belt, I’ve learned what tools work best for the job and which don’t. I’ve listed my absolute favorite tools, which are well worth the investment and make the job go so much faster.
- Bullet Tools 9 in. EZ Shear SharpShooter Siding and Laminate Flooring Cutter
- Roberts Laminate and Wood Flooring Installation Kit
- Rubber Mallet (or dead blow mallet)
- Dremel Saw-Max with Multi-Purpose Wheel
- Floor Scraper
- Pry Bar
- Tape Measure
- Pencil
Installation

Prep your flooring surface before you begin installation. For us, this meant taking up the old carpet, tack strips, and baseboards. You can leave your baseboards if you would prefer, but you would then need to install quarter round over the edges of the flooring. In taking up the baseboards, I chose to do so carefully so that I could reinstall them once the new flooring was in.

Read the included instructions on how to install the Pergo Outlast+ flooring, and plan out where you will start the install. Typically, this would be the longest wall in the room.

The planks will have different pattern variations to them. Each box had the same types of patterns in them so to make sure we didn’t duplicate anything, we stacked like patterns together so we could be sure to alternate them during install. You don’t want to end up with two exact planks if you don’t have to.

With all of the tools I mentioned above, this flooring is so simple to install and can be done relatively fast. We had most of it done in a single day, then stopped for a few days when we decided that it would be the perfect time to finally frame a wall to add a little separation between our bedroom and bathroom. Once we finished that job, the rest of the flooring went in super quick.
The Big Reveal

I couldn’t be happier with how the room turned out with the new laminate! It actually feels bigger now, and the contrast between the wood and the grey walls looks so good! Knowing firsthand how durable this flooring is (and knowing that it’s safe from a wet dog), I know it will last us for many years to come!
If you’re looking to update flooring in your home, now’s the time as The Home Depot has the latest trends in flooring at great prices – check out other laminate flooring highlights here.
The post Master Bedroom Refresh with Waterproof Laminate Flooring appeared first on The Home Depot Blog.


No Responses Yet