Spare Room Space Turned Custom Closet

In our 140-year old home, closet space is at a minimum. Our master bedroom was actually built without a closet! We contemplated many different types of built-in cabinetry to be installed in our room. But with a 13×13 footprint we didn’t really want to crowd the space.
Finding the Right Space to Repurpose
Instead, we decided to steal space from a tiny spare room adjacent to our bedroom. We had been using this space as a bedroom for our 4-year-old.

Building My Custom Closet
I knew I wanted our new closet to look like it was meant to be there. Not just like a room that we threw a closet rod in. So I opted to use Home Depot’s Unfinished utility cabinets as my starting point to build the custom closet of my dreams. The utility cabinets are great as they allow for a great amount of extra closed storage.

Making Space
Our first step in this process was to create a closet opening. We opened up the non-load bearing wall and took out two studs to create a rough opening of 44-in. We may eventually add a set of french doors. For now, we are enjoying the open space as it makes our bedroom feel much larger. Plus with the new opening, we gain an extra window, win-win!

A Custom Wall with PVC Lattice Strips
Next, I wanted to create a feature wall, so I created an easy grid wall using PVC Lattice Strips for interest. I chose PVC because our walls slant and slightly curve, and these easily conform to the wall. Once I decided on my layout, I nailed the strips to the wall with my Porter Cable pneumatic brad nailer. Then, I caulked the seams, and painted it out in “LeLuxe” by Behr Paint.


Maximize Your Space
After that, I brought in my utility cabinets. Because we have almost 10 ft ceilings, I was able to maximize space by building vertically. I purchased 2 3/4 in- 4×8 sheets of mdf, and had them cut down to create four shelves for above each of the cabinets. As well as a shelf tower on the side of one of the utility cabinets. Also, I had some pieces cut for the smaller shelves for that tower.
I like to utilize the structures that are already in place in a room to create built ins. In this case, I built off of the door casing to build the tower and then placed the small cabinets within it. I used small ¾-in square dowels screwed to the sides to support the shelves.

Picking the Right Paint Color
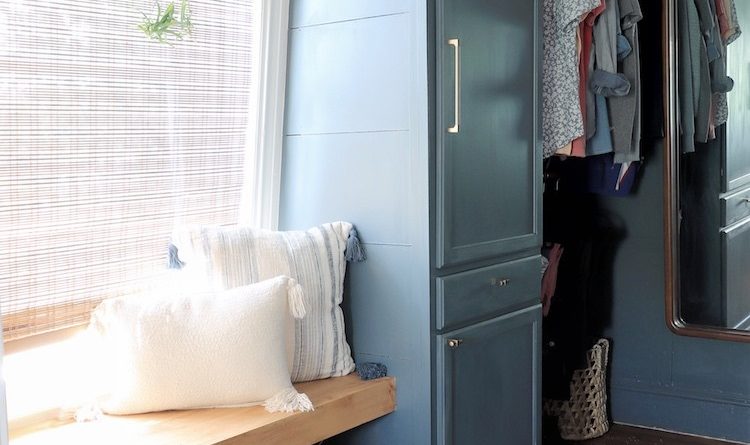
I had a really tough time deciding on a paint color for the cabinets. At first, my typical neutral-loving self thought to paint it a creamy white. But after some convincing from one of my friends, I chose to paint the entire built in the same Behr Le Luxe color as the feature wall. I’m so glad I did, as it makes it look like a truly custom piece.
Installing Clothing Rods
The next step was to add the clothing rods. I used 2-72-in Heavy Duty Hard Wood Closet Rods and just cut them in half with my Ryobi sliding miter saw to make 4-36-in rods. I installed them using 1-5/16-in Heavy-Duty Brushed Nickel Closet Pole Sockets (2-Pack), spray painted in Metallic Gold Spray Paint by Rust-Oleum.


To finish off the custom closet, I added a glass pendant, with spray painted ceiling medallion, some brass handles and knobs, a pretty runner and a cordless woven shade for texture. I used a large vintage mirror directly in the center to give it the feeling of a high end dressing room.


Getting Organized
For storage, I built a few scrap wood crates for the side shelves, and purchased some ClosetMaid cube storage bins, under-bed storage bins, and used some baskets to keep things organized.

Creating a Seating Area
Last but not least, I was left with some space in front of the window where I had originally planned on putting a desk. Instead, I opted to build an easy wood board bench. I used 1×2’s as support, and laid common pine boards across the top. Then, I used some 1×2’s to hold the boards together underneath and to add additional support. I then added a 1×8 to fit under the bench for even more support. I am so happy I chose to build a bench here, as it’s a great little quiet space to curl up with a book.


Creating this closet was the best decision we could have made for that extra space, we are totally smitten with this little room and are so excited to have so much extra storage space. Thank you to Home Depot for helping to make this new closet/dressing room possible!
The post Spare Room Space Turned Custom Closet appeared first on The Home Depot Blog.


No Responses Yet