A DIY Summer Backyard Makeover – Before & After

Our Texas Home
I feel lucky to call Texas home and love that we can eat and play outside all year long. In the last 6 years, we’ve done a ton of work to the inside of our 1946 ranch style home, including two bathroom remodels and a total kitchen makeover earlier this year. The backyard is one the most used spaces in our home and I’m thrilled to finally give it the makeover it deserves!
Making Changes to our Home
After living in our house for 6 years we knew exactly how we used this space, and what we’d like to do to make it perfect for our family. Here are 3 major changes we wanted to make with our backyard makeover.
- Enclose our side yard to make include it on our backyard.
- Create dedicated trashcan space for 3 cans.
- Make pathways from the patio to the garage and the trashcan patio.
The Backyard

Here is the space we were working with. See the fence attached to the side of the stone? That fence currently blocks the side yard from our backyard and it seems silly not to move that fence back 20 feet and include the side yard in our backyard. (For tons more backyard before pictures, check the evolution of our backyard patio.)
Before

We also have a large patio off of our backdoor where we love to entertain guests and grill out. We knew whatever material we choose to make the pathways, we would also use to cover our existing cracked concrete slab.

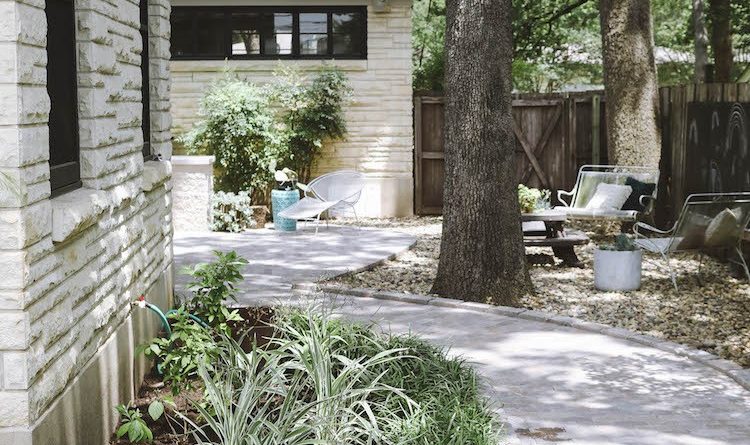
After a lot of research on pathway material, we choose Pavestone Rumblestone, Pavestone Limestone, and Pavestone Rockwall from The Home Depot. Pavestone has beautiful, functional, easy to install paving options, and we love that the kids can use the pathways created to ride their trikes on. This is a huge perk of the backyard makeover we hadn’t thought through, but our preschoolers and their friends love to race around the “track” created by the Pavestones. It works out well for everyone!
A Space to Store Trash Cans

The dedicated trash can space has been an issue from the beginning. The only logical space to put the cans was in the middle of the driveway in front of our garage. It was such an eye sore! Now, we have a convenient space for the garbage, recycle, and compost cans to live complete with paved walkways to and from the driveway and the back patio. It’s seriously amazing how much of a difference this seemingly small change makes in our daily lives.
After


I already mentioned the importance of pathways from the backdoor to the trashcan patio. It was also important to have a pathway from the backdoor to the garage door since that is where our laundry room lives. The Pavestone pathways are perfect for hauling laundry, trash, and chasing kiddos!

We made a last minute decision to create a dedicated grilling space. This doubled as a way to block the AC unit from plain site on our main entertaining space. I’m so happy we spent the time and money to make this big change. I love how it turned out!

Smaller Weekend DIY Projects
Our backyard renovation took more than one weekend to complete. Many pieces of this project are perfect for a weekend DIY. The grilling station, the trashcan patio, and covering an existing concrete patio slab can all easily be done in a weekend. Home Depot even delivers the pavers directly to your house. And you can save 10% when you buy qualifying amounts of Pavestone.
I’m so happy we decided to tackle our backyard and create the outdoor space we always wanted. The goal of our backyard makeover was to make the most of the space we have. And ultimately create an outdoor playroom for everyone to enjoy year-round.
The post DIY Summer Backyard Makeover appeared first on The Home Depot Blog.


No Responses Yet