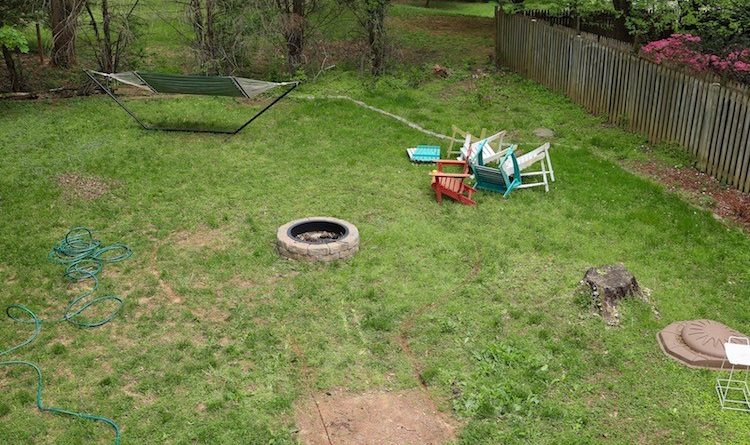
Before the Makeover

Fire pits are a great addition to your yard. They can add space to gather with friends and family. They’re super easy to build when using a DIY fire pit kit too. In as little as an afternoon, a fire pit can be assembled, and by the evening, you’d have a nice fire roaring in your backyard.
The DIY fire pit that I built last summer for my family looked great, but by the spring, it looked pretty lonely sitting in the middle of the yard. It needed a seating area to define the area and to anchor it to the yard and patio.
Materials
- Fire Pit kit (you can also use concrete blocks)
- Pavestone Rumblestone Edgers
- Pea gravel
- Transfer Shovel
- Garden spade (for clean, straight edges)
- Tape Measure
- Paver Sand
- Tamper
- Level
- Landscape construction adhesive
- Caulk Gun
- Outdoor Adhesive
- Mallet
- Wheelbarrow
- Weed Block fabric
- Sod Staples
Step 1. Call 811 Before You Dig
Before you do any digging in your yard, be sure to call 811. Calling 811 will send someone for free to your home to mark the location of your utility lines. This is pretty important, so be sure to not skip this step. It’s also helpful to snap a picture of where the utilities have been marked and save it. You’ll be able to reference it later.

Step 2. Determine Your Fire Pit Location
Check with your county or city code about the location of your fire pit. In this case, my fire pit needed to be at least 20 feet from any structure. You’ll also want to plan accordingly with its location based on the edgers you’ll be using. Plan your fire pit location and keep in mind how many edgers you’ll need to get a rounded number of edgers needed.

Step 3. Plan Your First Row of Fire Pit Bricks
You can complete this DIY project using a fire pit kit or concrete blocks from The Home Depot. You’ll need a metal ring that will protect the bricks from fire and heat. Place the first row of bricks with the fire pit ring in the center, making sure the bricks fit tightly and securely.

Step 4. Mark Your Fire Pit Seating Area and Path
Plan whether your fire pit seating area will have a path leading to the fire pit from a patio, door, etc. The biggest challenge will be keeping it straight. Use a board for spacing along with stakes and strings to keep your walkway straight. A 36” walkway is a good spacing.

If you’re putting in a fire pit only, you can use a shovel along the edges to mark the grass where the stones will be sitting. However, if you are putting in a seating area along with the fire pit, the entire grassy area around the fire pit will be removed.

Step 5. Measure the Seating Area
The easiest way to create a perfect circle around your fire pit is to put a stake in the center of the fire pit and attach a string to it going around the circumference (marking with spray paint) so that all your measurements from the center of the fire pit are perfect.
In my case, I didn’t have a stake or a string, so I simply measured 5’5″ from the edge of the location of the fire pit bricks and marked the distance with spray paint.

Step 6. Dig Out the Fire Pit and Seating Area
If you’re only putting in a DIY fire pit with no seating area, you’ll only need to dig out the area where your fire pit will be seated. Dig down 2-3 inches.

If you’re putting in a seating area and a walkway leading to the fire pit, there will be more digging involved. For this part of the project, I used a cultivator. A sod cutter is a great option to make this job go faster. You can rent one from The Home Depot’s tool rental department. You’ll also want to find an area to place the excess soil you remove.

Step 7. Add Paver Sand, Tamper and Check the Level
Using paver sand under a fire pit helps to level the ground and provide some stability for the bricks. I added about 1.5 inches to 2 inches of paver sand, water to make it more compact and then tampered it. You can’t tamper more than about 2 inches at a time. You may have to tamper, water, add more sand and tamper again. Make sure you check the level of the paver sand before adding your fire pit bricks!

After adding paver sand, check the level of the first row of bricks. Add or subtract sand as necessary.


Step 8. Glue the Bricks for the Fire Pit
Use outdoor construction adhesive to glue the fire pit bricks together. You’ll want to make sure the bricks are tightly in place and don’t “rock” back and forth. Be sure to stagger any seams.

Insert the fire ring once the bricks have dried. Follow the manufacturer’s instructions on whether to add sand, gravel or another material inside of the fire pit. If you’re creating a DIY fire pit alone, this is how it should turn out!

However, if you’d like to create the seating area around the fire pit, there’s still a bit of work left to do. You’ll need to use the cultivator or a sod cutter from The Home Depot Rental Center to remove the grass surrounding the fire pit. Find a place where you’d be able to dump the excess soil. Use a garden spade to carve out the edges of your fire pit seating area. Check the level of the area and remove or add soil as needed.


Step 9. Add Weed Block Fabric to the Fire Pit Seating Area
If you’re putting in a walkway and seating area around your DIY fire pit, then you’ll want to use a weed block fabric to deter weeds. You won’t entirely prevent weeds from growing in your gravel fire pit seating area, so there will be a bit of maintenance and killing of weeds each season. Use sod staples to hold the weed block fabric in place.

Cover the entire fire pit seating area with weed block fabric, using sod staples where necessary to hold it into place. You won’t need to put weed block fabric under the fire pit directly.

Step 10. Line Up Edgers Around the Fire Pit Seating Area
When putting in the edgers for the walkway and seating area, make sure they are level and even. For any edgers that are uneven, remove extra soil or use paver sand to level out and stabilize the edgers.

Sit the edgers on top of the weed block fabric. As previously mentioned, make sure that you measure the size of the edgers you’re using when planning your fire pit seating area because you want to make sure you have an exact number of edgers for the space you’re completing. This helps bricks to meet nicely at any corners without needing to cut or trim edgers.


Step 11. Add the Gravel
Pea gravel is great to add to a fire pit area because you don’t have to be precise, it’s comfortable to walk on, and it doesn’t cost much per bag. Cover the entire weed block fabric with the pea gravel. Be sure that there is enough to cover the fabric without it showing through. Aim for a minimum of 2 inches of pea gravel.

Step 12. Add Seating
Add comfortable chairs that will welcome your guests. The Pavestone Rumblestone collection offers bench kits that would look amazing around the fire pit!

Step 13. Add Stone Planters
The Pavestone Rumblestone collection offers bench kits, as I mentioned, but I chose to use my bench kit as low planters. Planter kits are also available!

The Final Look
DIY fire pit kits are super easy to assemble. Carving out a fire pit seating area is always a bit more challenging because it’s back-breaking work! But you can do it yourself in as little as a weekend. If you have help–even better! .
With a new fire pit seating area to anchor the fire pit, along with pretty planters, a new patio rug, and fresh flowers, this patio and fire pit are ready for spring and summer entertaining!

The post How to Build a DIY Fire Pit with a Seating Area appeared first on The Home Depot Blog.


No Responses Yet