Hey friends! It’s Mandi from Vintage Revivals! Today we’re diving into the muscle-making, sweat-inducing world of installing perfect patio pavers!
Our original plan was to clear out the old pavers, move the planter beds back, square everything off, install our Pavestone pavers and call it a weekend. But as it usually does, things didn’t work out that way.
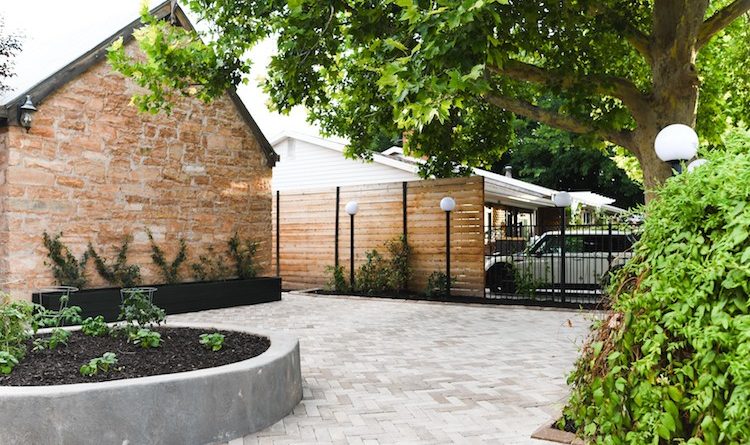
For this project I chose Pavestone Rumblestone Plank Pavers in Cafe.

I loved the elongated shape and knew immediately that they needed to be laid in a herringbone pattern. One great feature with these pavers is that they are significantly thicker than a lot of other styles. This means that they can be used in places that have heavy use like driveways!

Where We Started
Everyone loves a good before picture right? This is where we started! Loads of different (an uneven) pavers, overgrown bushes and bad news water issues!

Grading
After we took out the old pavers and bushes along the Merc, we were faced with the cold hard truth that the grading (the slope in the ground) was angled so that water drained into both buildings on our property. Water is quite literally any building’s worst nightmare, so that issue needed to be addressed immediately.

We called an excavation company to come and regrade the property. Once they were done, and any potential water was going the right direction, it was time prep the ground!

Next Step: Ground Prep
Once your grading is correct, there is some ground prep that needs to happen before you can lay your pavers.
While I was on homedepot.com I came across a paver base panels. I dove head first into every bit of info that I could gather and ultimately decided they were perfect for our project.
Paver base panels are a foam mat that you can use under pavers to replace the 4-6” of road base that you traditionally need to use. They have killer reviews and saved us hours of physical labor hauling literal tons of material! If you are laying a patio or walkway, you should definitely do your research and decide if they are right for your project!
Start by compacting the soil on your freshly graded ground. You can rent a plate compactor that looks like a little lawn mower. It vibrates as you push it along and compacts the dirt. You’ll want to do a few passes to make sure that it’s compacted well. Skipping this step can cause pavers to be extremely uneven.
Once your soil is compacted, lay down weed barrier. This will prevent weeds from growing up through the pavers as well as keeping the next layer of sand from washing away.
Speaking of sand, once your weed barrier is down, lay 2 pieces of ¾” PVC pipe on the ground about 3 feet apart. They’ll follow the slope of the grading (super important!)
Shovel road base sand in between and slightly over the top of the PVC pipe. It’s important to use sand that is made to be compacted. Playground sand won’t work for a project like this, is too smooth!

Level the Sand
Use a 2×4 or large rake to screet the sand. You’ll do this by putting it on top of the PVC and shimmying it down the pipe. This will level the sand between the PVC. Make sure you don’t step on it after you’ve leveled it!
Remove the PVC pipe and fill in the gaps. Smooth the surface so that it’s level with the other sand.
Lay your paver base panels on top of the leveled sand. Once the panels are down you are free to walk on it!

Laying a Herringbone Pattern
The first thing that you need to decide is the direction that you want your pattern to lie. It’s easier if your pavers run parallel to a building or hard edge, because you can easily work off of that.
If you’re ambitious (or a glutton for punishment like I am!) you can lay them perpendicular to the structure.
Start by setting a masonry line that will sit just above the tops of your pavers. This line is your guide for the entire pattern, especially if you aren’t working off of the edge of some sort of structure.
I had a few different ones that were my guides, if you look close you can see them in the picture below!

Line your pavers up so that they hit on the same point all along the masonry line. Be fanatical about checking your line, it’s easy for things to get off a little!
The hardest part was cutting the smaller pieces to fit along the edges of the patio. We tried a few different ways and ultimately decided that it was easier to place the whole row, mark with a chalk line, and then remove and cut each paver individually. (As opposed to setting them and walking the saw along while they were still in place.)
For our edge pieces we used Pavestone Edgers in Cafe and I love how it finishes the patio off. The higher edge helps keep the mulch inside the garden bed and it looks amazing!
Our Paver Patio


The post How to Install A Herringbone Paver Patio appeared first on The Home Depot Blog.
No Responses Yet