Minimalist Electric Fireplace
Hi, I am Jenni from I SPY DIY and excited to be back with another project for The Home Depot! Ever since we started renovating our new house, my hub and I pictured a fireplace in the living room. It’s the first thing you see when you walk in the door, and we knew it would add a charm to this 140-year-old home. Sadly, the original fireplace was right in the center of the kitchen, so we had to demo the chimney during the renovation. We went back and forth about getting a gas or electric fireplace, and ended up going with an electric fireplace because of the super-slim profile, which is great for the small living space (the fireplace is less than 10” deep), plus we did not have to run any gas lines or open any walls, which made this a quick project that we could have done before the holidays! I am IN LOVE with how it turned out!! And think it adds so much warmth to the living room.
The basics: A few things before you start!
The project took about 5 days to complete working on it for around 2 hours each day. The materials cost approximately $150 and the fireplace insert was $300. We went with an electric insert because we wanted a shallow profile, this insert is only 8-in deep. I would not recommend this tutorial if you are using a gas insert. Our electrician installed a 3-prong outlet on the floor to plug in the electric fireplace, check the requirements on the insert you pick. We hid all the cords within the wall, and they can be accessed by pulling out the insert. And we use The Frame TV, which lays flat to the wall and looks like art when it is off. The is a components box that we hid behind the TV, and we just have Netflix and Hulu so there is no cable box.
Ok, here we go!
Project Supplies:
2x4s
Sheetrock UltraLight 1/2 in. x 4 ft. x 8 ft. Gypsum Board
SHEETROCK Brand All-Purpose 1.75 Pt. Pre-Mixed Joint Compound
Grip-Rite #6 x 1-1/4 in. Philips Bugle-Head Coarse Thread Sharp Point Drywall Screws (1 lb.-Pack)
USG SHEETROCK Brand 250 ft. Drywall Joint Tape 382175
12 in. Plastic Drywall Mud Pan
Wal-Board Tools 6 in. Hammer-End Joint Knife
DEWALT Fixed Blade Utility Knife
Grip-Rite 2-1/2 in. Construction Screw (1 lb.-Box)
Drill
GE Supreme Paintable Silicone 10.1 oz. White Window and Door Caulk
3M 16.6 oz. Drywall Corner Bead Adhesive Spray
BLACK+DECKER 2.4 Amp Corded 5 in. Random Orbital Sander
Classic Flame 36 in. Traditional Built-in Electric Fireplace Insert
Step 1
First, we measured the wall and sketched up the dimensions based off my in-law’s fireplace. Then began constructing the back frame on the floor with 2x4s and wood screws.
Step 2
After building the back frame, we put in place by screwing into the ceiling stud and the floor.
Step 3
A couple notes:
We cut out the baseboard so it would fit tight to the wall.
There are two studs to hang the TV because we wanted options for the height
We ended up adding a 3rd horizontal piece to set the TV components on.
Ignore the extra pieces of wood on the base, that was a measuring miscalculation!
Step 4
Next, we built on the front frame, and attached to the back frame with 8.5” pieces of 2x4s.
Steps 5 & 6
Note: We set the insert in place to make sure it was deep enough to fit before screwing in the front frame.
Not shown: We added a 2×4 on the front frame above the insert to hold into place, important because you will screw the drywall into it.
We pulled the thermostat cord for the fireplace out between the 2x4s on the right side so we could access it after drywalling.
Plug in your TV power before drywalling, you may need to drill holes in the 2×4 frame to thread cords through to get to power source.
Step 7
Attach wood mantel by screwing in from underneath. I had this piece of live edge wood that worked perfectly. But you could also use barn wood, just make sure you factor in the thickness of the mantel if mounting a TV.
Step 8
Time to drywall! Measure, then use a square to mark on your sheetrock. Score each side with a utility knife to cut out.
Step 9
Attach by screwing each piece into the studs with drywall screws.
Note: Make sure the head of the screw ends up just below the surface of the drywall so you can cover up with mud.
Step 10
You can see where we cut out a space for the TV components, and a hole for the thermostat cord.
Step 11
We drywalled right up to the wood because I wanted it to look like it was built in to the fireplace.
Step 12
Next, time to mud!
Step 13
I found these vinyl corners super easy to use. I started by cutting a piece to fit.
Step 14
Next spray both of the inner sides with corner bead adhesive.
Step 15
Then spray both side of the corner.
Step 16
Push your piece into place, using your fingers or a tool to make sure it adheres.
Step 17
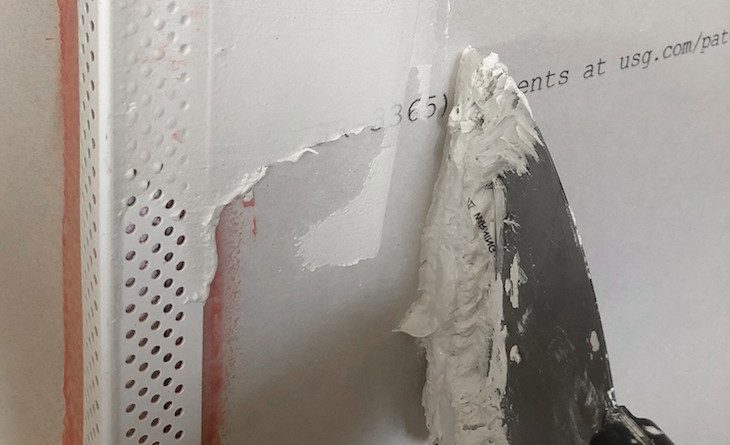
Fill your pan up with mud and knead it with the knife to get air bubbles out. Working your way from the outside into the corner, start spreading the mud to cover the corner.

Step 18
You will need 2-3 coats to completely cover the corner piece. I let each layer dry a day.

Step 19
I wanted a plaster look, so was liberal with the amount of mud I used and was not concerned with texture.
Step 20
I covered the whole fireplace with one layer of mud, and the nail holes and corners with 2-3 layers.
Step 21
After all the mud has dried, I sanded down some of the texture and the corners with an orbital sander. I left some of the texture to give it the look of plaster.

Step 22
Next use paintable caulk around the mantel and where the fireplace touches the wall and ceiling.

Step 23
After caulking the corner, run your finger to smooth it down flat.

Step 24
Last step is painting the fireplace! I taped off the mantel and painted on two coats of Behr Cotton Knit in a matte finish.

DONE!
The post Minimalist Electric Fireplace appeared first on The Home Depot Blog.

No Responses Yet