Making improvements and solving problems is human nature. It’s what drives our ‘to do’ lists, keeps us busy working and makes us productive humans. Today we’re tackling one of those nagging problems in the home which is a dark and dingy pantry closet. This is an easy, inexpensive and simple pantry organization makeover that almost anyone can tackle. And I’m kicking myself for not doing it sooner!

More importantly this pantry organization idea could be applied to any space in your home. The solution involves two tools: paint and lights. And that’s it. We all know paint is amazing and makes a great base to freshen up a space. Painting your home is something almost anyone can tackle. You may even have some leftover paint from another project that would be enough to cover a pantry or closet space.
Let me share the before photo of this pantry so you can see the real transformation.

First of all, it’s super dark and there was no lighting period. Secondly, the walls and shelves were dirty and gross from years of use. Time for a pantry makeover to solve those two problems.

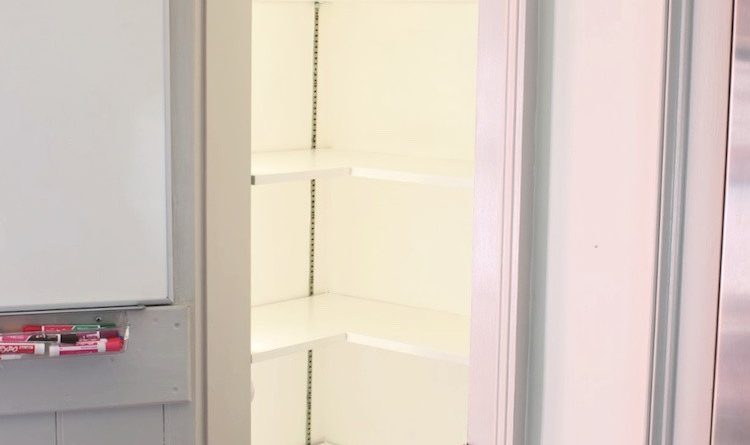
Amazing what paint and lights can do for a space! And now we can actually see the food in the pantry closet without having to use our cell phone flashlights. You could definitely take this pantry makeover project to another level with organizer bins and containers. But I prefer to group the items with just a few bins for loose chips and such while keeping everything visible.

For this pantry makeover I used one 10′ strip of LED under cabinet lights around the interior of the door frame. Installation was fast and easy and the results were immediate. The lights plug in to an outlet and are operated using a switch mounted to the interior door trim.
They are completely unobtrusive since they sit flat and flush on the wall. Also, they required no electrical wiring which means you can complete this project on your own.


For the shelves I recommend a satin finish and be sure to let your paint dry completely before adding items back into the closet. Looking at that beautiful, white space makes me giddy with joy, it’s almost too nice to clutter it up with pantry items.

Supplies
- sander
- Behr Premium Paint flat white (walls)
- Behr Premium Paint satin white (shelves)
- paint roller
- lights

Step 1
Empty the pantry space.

Step 2
Sand shelves smooth of any debris and prepare surface for paint. Then wipe down with a damp cloth.

Step 3
Paint walls flat white, I did three coats. Paint the shelves satin white.

Step 4
Open light strip package and determine plug location.

Step 5
Determine light switch location.

Step 6
Unwind light strip and determine placement.

Step 7
To attach lights, peel off paper backing to reveal the sticky adhesive. Press light strip onto wall.
Then turn on the lights and enjoy your bright and fresh new space!
The post Pantry Makeover appeared first on The Home Depot Blog.

No Responses Yet