Tips for Painting your Home’s Exterior
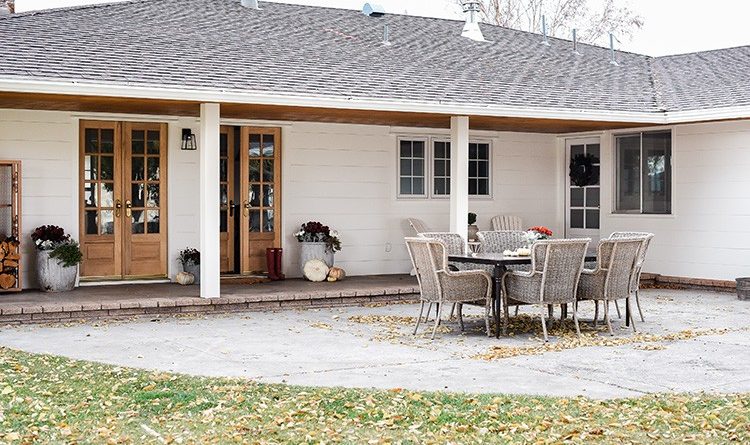
Over the past year, we have been busy remodeling our 1960s ranch house. We’ve tackled the kitchen, dining room, living room and laundry room, but we had yet to touch the exterior. This fall, we finally were able to have the house repainted with a little help from The Home Depot & PPG Paint. I couldn’t be happier with the results! While we didn’t alter anything architecturally (aside from adding a few doors), we were able to completely change the appearance of our home.


Paint is such a powerful tool when it comes to renovating; don’t underestimate how much a fresh coat of paint will update your home! If you’ve ever seen our entryway, you might know that beneath the black paint is 60s style wood grain paneling. Instead of removing the paneling and re-sheet rocking the room, we opted to give the paneling a nice healthy coat of paint resulting in a modern space full of charm.
If you dream of updating your home’s exterior, but don’t have the budget to dramatically renovate, try updating the paint. You might be surprised at how great it looks after!
PPG Timeless Paint and Primer is a wonderful paint line that offers amazing resistance to extreme weather. PPG provides complete one coat coverage saving you time and money. The paint is formulated to resist chipping, flaking and cracking and is even resistant to mold, mildew and algae!
Throughout the process of having our house painted, I learned a few things about painting. For starters, a good paint job is much less about the actual act of painting than it is the prep work that goes into painting. Like most projects you take on, prepping to do the job the right way is paramount.
Key steps to paint your home’s exterior:
Scrape – Check your home for peeling paint. This occurs often on wood trim! Trim receives quite a bit of weather ranging from extreme heat to extreme cold, which causes the paint to chip and peel. Use a scraping tool to remove the peeling paint from the wood or siding.

Pressure Wash – It is important to start with a clean surface when painting both interior and exterior surfaces. Don’t be tempted to skip this step! For exterior surfaces, you can rent a pressure washer or purchase an inexpensive one from The Home Depot. We purchased one a few years ago and use it about once a month – it was a great investment. By starting a paint project with a clean surface, your paint will stick better and last longer!

Caulk – This step should not be overlooked when it comes to painting! Caulking will help make the paint job look professional and high end. Use caulk to fill in gaps or holes that have been made since the last paint job was completed. You might even find it necessary to re-caulk areas that have received a lot of weather. We used caulk to fill the gaps between each board of our siding creating a smooth surface for the paint to be applied to.

Mask & Tape – Our painter insisted on using a hand masker dispenser from The Home Depot. This system expedites the tedious task of masking. Taking the time to mask off windows and trim is an important step that will help prevent the paint from getting anywhere you don’t want it to be!

Paint – If you’re comfortable using a paint spray system, your painting job will fly by. Don’t be intimidated by a spray system! As long as you spend the time masking all windows and trim, using a spray gun to paint the exterior of your home will go by very quickly. Alternately, you can opt to roll the paint on, this is a bit time consuming, but the results will be worth it!

Touch-up – Once you’ve covered your main surfaces with paint and have removed the masking and tape, use a 2” paintbrush to touch up any spots that you might have missed.
I hope these simple tips inspire you to tackle your next exterior paint job! Spend the time prepping for a beautiful result that will give you great curb appeal without having to renovate!
The post Tips for Painting your Home’s Exterior appeared first on The Home Depot Blog.


No Responses Yet