
Rick LaFaver of Wood Work Life gave his mother in law a house warming gift of a lifetime. With a little help from The Home Depot, he completed a gorgeous bathroom remodel in her new home. Find out his tips on how to pull off a DIY bathroom remodel project.
New Year Bathroom Remodel
This holiday season, I felt like doing something really over the top for my mother in law. She has been so helpful this year and just moved into her own place for the first time, so I felt like really hitting one out of the park with a bathroom remodel. The bathroom in her house had some major layout issues, but fortunately no major structural issues (short of being in a house built in 1895 and the complications that creates.)

For this bathroom remodel I wanted to give a super premium look and feel, but I wanted to minimize costs by making the process as simple as I could. I built the whole bathroom around Delta’s UPstile system, which gets you that custom tiled shower feel while still just technically being an alcove shower insert. Even so this is going to a huge undertaking, and I am on a bit of a time crunch, but there is only one way to eat an elephant…one bite at a time.
4 Considerations to Make Prior to Starting a DIY Bathroom Remodel
There are obviously a ton of things to consider before you start a bathroom remodel, but here are the top 4 for me in no particular order.
1. Anticipate potential problems to avoid road blocks
With any home DIY project, you should take the opportunity to address any glaring issues with the layout, functionality, or design of a space. BUT, some of these problems can be colossal undertakings and can derail an otherwise simple project. Before I started this project, I wrote a list of any problems I could think of and researched what each of them would entail.
In this bathroom the challenges I chose to take on were: the layout of the tub/shower, an incorrectly vented tub drain (often the cause of a slow draining tub), and an incorrectly installed tile floor. The stones I chose to leave unturned…the lack of square and plum in any room in the house (no one will ever fix this,) the bowing ceiling/roof (this will need to be addressed when a new roof goes on this house) and replacing the glass louvred door and wood framed window.
2. Be mindful of timeline and budget
You can do anything, if you have the time and/or skill. It is obviously important to keep every project to a timeline and a budget or things will get out of hand real quick. Where will you spend your money? Where will you spend your time? In other words, what will you do or even try to figure out how to do, and what will you hire a contractor for? I am personally pretty comfortable with basic electrical, carpentry, and drywalling but plumbing is not my thing. Since I wanted to finish this in a month, rather than learning how to fix the plumbing issues left behind from a hack job remodel in a hundred year old house, I hired a plumber.
Looking back at this project and seeing the finish on my walls, I wish I would’ve also hired out the drywalling and taping, those finishing touches can really make a difference.

3. Prepare for permits and inspections
Permits vary a lot from city to city and state to state and I am no expert but your local municipality’s website will probably be able to point you in the right direction. Typically you have the obvious stuff plumbing and electrical permits, an inspections after demo, another one after electrical and plumbing rough in, and the final inspection after the project is complete.
Please, do your research. Nothing will derail a project like having to rip everything out and do it all over again.
4. Plan your project in manageable steps
Define needs to come before or after what to make for the smoothest process. If you are having a plumber come out, try not cover any of the pipes, or finish drywalling beforehand. Make sure the tub and sink are on site to get the most out of your plumber’s time. If you are going to paint, (which you should even if you don’t have to, a fresh coat of paint is always so refreshing) try and keep all the finishes out of the space so you can paint as quickly as possible without worrying about masking, drips, and overspray. Figuring out the logistics ahead of time just makes everything so much easier.

Ok enough with mental gymnastics, let’s get to work.
Tear it up!

Demo is always my favorite part of a DIY project, taking a very large hammer to a room you hated is cathartic for some reason. Don’t forget to keep your mess contained because unlike on TV you actually have to clean up the mess after demo day. Make sure you rent a dumpster to haul away all the mess.
A reciprocating saw and a demo hammer can be a huge help during a tear down, I actually used the RIDGID MEGAMax, which is both for my remodel.

Fortunately, the previous installer didn’t properly bed in the subfloor with mortar, so even though I have had to re-grout this bathroom 3 times already, it came up super easily during demo. Everything else was easy enough to cut out or remove.
Rough In

For this project, rough in was a bit more involved than your average bathroom remodel. In a lot of bathroom remodels with an alcove tub (walls on 3 sides, only one long side of the tub accessible often identified as left drain or right drain) you could simply drop the Delta UPstile tub or shower system right in with little modification. In my bathroom, I had to rotate the tub 90 degrees and move the drain which meant I had to frame an entire new shower stall and a new tub rough in.
This is actually my second bathroom remodel this year and my second using Delta hardware. I have been nothing but satisfied with the ease of installation. Even the lower-priced models of the Delta hardware come with hardware and rough in kits that simplify install and eliminate a lot of the pitfalls of generic “builder grade” faucets.

While the plumber was there, I also set the bathtub into a bed of mortar and hooked up the drain. My plumber didn’t want to appear on camera, so I didn’t get any shots of that.
Installing the Delta UPstile System

My first bathroom remodel this year had a full custom-tiled tub surround. While it doesn’t replace the look of a subway-tiled tub surround, the Delta UPstile system is A LOT more simple and affordable than a custom tiled tub surround.
First, there is no waterproofing to worry about; once you caulk your seams, you’re good. Second, you don’t have to first install cement board so no cement dust or special cutting wheels to worry about. Third, you don’t need to involve yet another trade in your bathroom remodel and that much more time and money to tile the whole surround.


All of these things are true with any tub or shower insert, but with the UPstile system, you still get the look of a subway-tiled custom shower install. You even get a slot to install your own glass or decorative tile insert.

The decorative tile insert is designed to be used with 6” mesh backed tile squares and 1/8th inch grout lines (6 ¼” slot), but you can easily install other tile as well. Since the shower surround is made of pronamel, which doesn’t bond with mortar, you have to use silicone-based kitchen adhesive to attach the tiles for the insert. I used DAP Kwik seal plus kitchen and bath adhesive in clear. This is super easy to do, but do give the manufacturer’s FULL dry time before removing the spacers. Kitchen adhesive remains a lot more flexible than mortar when partially cured, so if you take the spacer out early you can really ruin the look. I cut some 2 and half inch by 8 inch tiles on a wet cut tile saw to fit the slot to continue to the subway tile look.

After installing the tile, you can treat it like usual and grout using whatever color you like. I recommend a bright white grout to match the rest of the tub surround kit.
Tiling the Floor

For the floor, I went with a wood look porcelain floor tile from The Home Depot’s Home Decorator collection. Wood look tile has come a long way; it used to be 7 or 8 prints duplicated ad nauseum, but the new stuff is great, I didn’t see a single repeat in 6 boxes. Pro Tip: If you ever want to see some cool and unique products for your next project, go to The Home Depot’s website and search: “Home Decorators Collection.”
The problem the previous installer had left me behind was a blessing and a curse. I had re-grouted this floor three times because he didn’t put a bed of mortar under the cement board subfloor. At least it was easy to tear up the old tile floor though. After installing the new cement board subfloor, I installed the floor.

When cutting porcelain tile like this to get clean scores, use and angle grinder and a continuous rim diamond blade, I used a Ridgid brushless grinder and a Ridgid continuous diamond blade. Another pro tip I ran across when designing the bathroom: With wood look tile, pick a grout that is one tone darker than the darkest tone in the tile in my case this led me to charcoal grout.
Installing the Toilet and Sink
Installing a toilet is super easy and it is usually the first thing I do when I move into a new house. I am not incredibly comfortable sitting on someone else’s throne. It is as simple as press fitting the wax ring, dropping it on and tightening a few bolts. It is important to level the toilet with a few composite shims and tighten down the toilet bolts evenly so you don’t crack the porcelain. In my case, I also had to use an adapter for the cast iron waste stack. but otherwise no big deal.
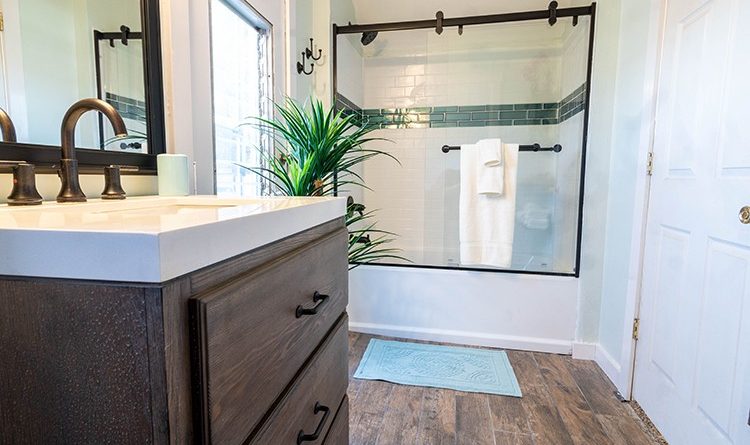
For the sink and vanity, I chose another piece from the The Home Depot Home Decorator’s Collection. I wanted a vanity that matched the wood look flooring and added a bunch of storage, so I went with a 3 door vanity with a weather oak finish to match the floor.
I used Delta’s Venetian bronze faucet hardware kit to finish it off. Again, I love the equipment this kit came with. Rather than running your own braided hoses from the water supply, this kit comes with its own integrated pex fittings. There’s something about a really nice sink faucet in a kitchen or a bathroom that just really puts the cherry on top of a remodel.
I approach kitchen and bathroom remodels using luxury car design philosophy, the contact surfaces are the most important elements to give a space a luxurious look and feel. Everything from the door knob, to the faucet handle, to the toilet flusher should be quality materials and interesting textures, these little details really bring a spaces feel together.

Trim Paint and DONE

FINALLY, I mean this bathroom went quick and it was pretty easy, but just the sum of all of it in one month was just…a lot. One of the most enjoyable parts of any project is putting on the trim, those last little touch ups of paint and putting on the finishing touches. With this one, I was able to really decorate it to get all the oohs and aahs from my mother in law.
After a month of making all manners of dust and mess in her house, I was finally able to show my mother in law Ruth the bathroom remodel. I think the look on her face said it all, but she loved it. It is such a nice space to just soak in a bath and go through your morning routine for work. I have always said a bathroom is like a mattress, you are going to use it everyday, so you might as well make it as nice as you can.
By properly framing the wall for the new alcove, adding insulation and getting rid of a poorly installed glass block window, the bathroom is a lot more comfortable now as well. I hope it serves her well, Merry Christmas, Nana – from me and family!


The post New Year Bathroom Remodel appeared first on The Home Depot Blog.


No Responses Yet